Explaining The Aussie INPA boxMk 2, Released 2015
THE ORIGINSPlans and a video for the first Mk 1 version of this box have existed on my website for some time now, but there has been no formal explanation of the development of the box. This has been done, but in pieces to various groups and at various times. It is time to bring it all together. The start was way back in the mid 2000s when I decided that I could not use the dominant box that involved methods that were too destructive of bees. My background is animal husbandry, so all management should be for the benefit of the subject, not do any harm. I have had honey bees and stingless bees since my pre-teens, the practices used in honey bees are well known, and I can see no reason to treat stingless bees differently. My first dry split box came from these concerns back in 2007, simply double ply separators in thick walled rectangular boxes. These still exist today, and work just fine, but the concept has evolved through round, then octagonal to square boxes with the objective of an upright box to facilitate the role of the thermal engine of the stingless bee colony, the involucrum, and minimisation of honey and pollen pots damaged when dividing. I perceive this as a major issue with the current designs of rectangular boxes and an effective double separator concept is a method to counteract it. THE BOXES CONTRIBUTINGThe box of Paul Anderson, from Cardwell was a major contributor to the early concepts and development of this box. His box was the first I have found in Australia to use a modular design with a separator. It is an excellent hockingsi box. It was modular, used a single separator between shallow boxes and could be expanded to suit the size of the colony. The box design of John Klump, the KITH, which is a round tubular box contributed to its change in orientation, and its observation panel, convinced me of the merits of this feature, not that there was much chance of it being left out. The square box designs of Peter Davenport and Col Webb added to the early thought process to go square, and showed the brood developing to the very top of such boxes. They showed it was possible, and at the split point there were few honey and pollen pots to break. That after all should be the primary objective of any design and gave ideas as to how to modify the boxes. In particular Peter Davenport had found that in a two box concept, reducing the height of the top box, increased the chances of brood being present in both boxes. This was pivotal in final box dimensions. Col Webb has introduced a separate bottom board with its own entrance, and support structure. He showed that stingless bees recover more quickly if they are able to grow their nest upwards. This is especially the case where the top of the involucrum is already at the top of the top box. It allows the placement of the original top box to the new bottom box position. There it can be properly supported. Slumping, that problem of stingless beekeepers for more than 2 decades, becomes a thing of the past. My first effort was the double cube box, with paired acrylic separators, and internal structural mesh support to control the diameter of the brood and involucrum and provide vertical support. At that stage a trip to Brazil exposed me to a great diversity of boxes and their very advanced industry and research, and in particular their INPA box. Many versions of their boxes utilised separator systems that were very similar to those I had in use, a case of parallel evolution. Others had simpler corner supports and single separators to prevent honey and pollen pots being built across levels. The bees will normally allow a bee space against such structures, so a division can be relatively clean, and perhaps just break the top of honey pots with little spillage. I also found the PNN box which had both top and bottom structural support, and had been introduced in Brazil as a rectangular box back in the late 1940s. It is a delightfully simple box. It is an excellent box, just why not here? No where did I see the destruction and bee losses inherent to our most common boxes. Out of this, I stayed with the INPA square concept and call mine the Aussie INPA. It seems that the idea came with a researcher from Africa, Portugal Araújo, who worked at a Brazilian research centre, Instituto Nacional de Pesquisas da Amazônia, INPA for short. He developed the INPA box in Brazil and others have followed. Giorgio Venturieri and Ailton Fontana are two with who I am familiar. In Brazil, it continues to develop in the hands of the Ailton Fontana especially, to near Apis capabilities. I am more than happy to continue the development here in Australia, where I now even add honey collecting plastic frames, with a rotary extractor. This has gone where no one else in the world has gone, a truly unique, and patented Australian feature. OBJECTIVES FOR THE DESIGNThe design should be modularAn effective modular design means that a super from any level can be placed at any other level during a division, to greatly facilitate the division operation. In particular, stingless bees develop their brood structure more rapidly upwards, this can be utilised in divisions. Once the decision to include a bee space between the separators was made and included, this became very easy indeed. The first clues to this appeared in my very first box with separators of ply. Confirmation of my bee space estimations came from work by Giorgio Venturieri when he was in Australia, and spending time developing a box for our bees with Chris Fuller. The design should be convenient for division, and give good access to brood material should techniques change. It should be heat and cold resistantUse of thick timber ( around 40mm) helps maintain temperatures in the desirable ranges, and provision of a suitable cover and base completes this. I have used data logging temperature recording equipment, to assess the comparative performance of different boxes by the different time lags in temperature performance under the same conditions. It is only through testing of actual performance by continuous recording to give 24 hour graphs, that an idea of performance can be obtained. My base line is the performance of a colony in a good log. Spot reading just confuses the readings with lag effects. IR readings can be misleading. I set up my data loggers in an Apis colony, and Apis are the masters of thermal regulation. It took them nearly 12 hours to reach a steady state. What meaning can a spot reading have? It should reliably support nest structureUse of paired separators ensures that all structure is always supported, and makes each super level a self supporting unit, with its bottom fixed separator. Each super of the brood area contains sufficient brood material and stores for propagation. A bee space of 5mm between the two separators, is used by the bees as a passage way, easily bridged and accessed. It minimises losses from squashing. There is, with the new design, a precise matching of boxes, but a reduced contact area. This reduces the risk of bee losses. It should allow observation and management as technology developsThe provision of a transparent and flexible observation panel brings us into line with much of the rest of the world, and allows convenient checking of progress. It also has the opportunity for feeding and pest trapping as necessary. This is particularly relevant with other methods of propagation, which is widely practised in Brazil and simply known as Natural Propagation to them. That is a different topic, but will be covered on this site as it needs to be introduced to Australia. Tetragonula hockingsi especially adapts well to the technique, and it works with T carbonaria with good management. Pest control is a must when transferring bees from logs or other sources such as water meter boxes. Even when the absolute minimum of honey is transferred, this is a time when damage occurs. Traps have long been available, originally designed by Col Webb, I believe, for internal use in colonies, and a simple mount in the inspection panel makes this process very easy, and very effective if phorid flies do penetrate the colony. It allows recharging, and removal. It is much more effective than traps outside the box, also catching some small hive beetle (SHB), a much more worrisome pest. It needs to be aesthetically acceptableNo matter what the box, it needs to be aesthetically acceptable. While this is always subject to personal views, the cost of a good looking and well made box is little different from a basic box. This is an area where many views will be presented, I will have to balance them with the functions that I seek to achieve. Above all I, am always ready to change, but not at the expense of function as determined by those temperature recordings. It also has to allow the incorporation of new developments for stabilisation of temperature. And as well, it has to be efficient from a construction point of view. There is lots to balance as I have found. The materials need to be durableThe materials used and exposed to the elements need to be of high durability. If of timber, durability category 1 and 2 timbers are a good basis for this decision. The widely used Hoop Pine and Cypress pine have a limited life in a field situation, especially when the instructions are to put them into ‘shade’ to protect from heat. They are Category 4. No builder will guarantee hoop pine past 10 years, and while cypress may resist white ants, it will rot in moist coastal situations. The painted coatings used to ‘protect’ are very easily damaged, and simply become a sheath behind which the fungal activity can take place unhindered once moisture penetrates a damaged coating barrier. Short of using chemicals such as copper napthenate that have no place in a stingless bee box, where ‘organic’ is the aim, the only ways I can see, are to use a wax/resin dip of natural timber or perhaps multiple coats of natural oils such as Tung Oil. The wax/resin dip has been used for many years for Apis. It very effectively seals the end grain of timber reducing end cracking or checking. It is more natural for stingless bees which basically varnish the inside of their nest cavity, and this dip is little different. It even provides them with resources to seal up quickly. As well, eventually, the resins can be from the stingless bees own collection, and perhaps even contribute more to the durability of the timbers used. At the very least, the end grain of all timbers should be treated with wax or oil to prevent deterioration. Tung oil works as an oil treatment quite effectively, applied as multiple thin coats. My timber of choice is tallowwood, and the very highest quality, care needs to be taken to avoid treated timber. This is an Australian Eucalypt and a hardwood. It needs to be dry, as it will shrink. It needs to be pre-drilled for screws, and always design the joints so the outer piece of timber has holes that are a loose fit on the screw, so the screw can pull the timber tight on the other piece. Thick, good quality timber, stacked carefully is not an issue with twisting and cupping for most applications. Special care has to be taken with wide boards. That goes for all timber. The other timbers that I use are White Beech, which sadly is very difficult to get now, and only imported. The imported White Beech is Category 2 durability, the original local timber was Category 1, and used here at Samford Valley for fence posts. I am now using Western Red Cedar, for the latest batch of timber. It is all a question of economy and sizes available. I always use 40mm thick walls and bases on my boxes. Covers are more complex. A good timber needs to be matched by a similar fastening, and stainless steel is the logical choice for a box designed to last a long time. Any metal product used in the box is also stainless steel. Any mesh is stainless steel. The separators that have been a feature of my boxes from the start, were originally ply. I shifted to food grade and flexible PET-G plastic sheet. It is easily cut with a table mounted router, and wood working machinery. Food grade acrylic is equally suitable, and also used. I did find a zero emission ply that was suitable, which I had again started using until the stainless steel became the preferred option for me. It has the advantage of being more rigid, like my original ply. I now use laser cut stainless steel sheet for the separators. This is readily accepted by the bees, and the most durable of all. I do not take the separator sheets to the outside face of the boxes, part of my temperature, moisture, and pest control. Galvanised materials will eventually deteriorate in the environment inside a stingless bee nest; the result is the introduction of heavy metal contamination. They have no place inside a stingless bee nest. It needs to be portable and position flexibleThis is a hard one. Any square box that is modular, by necessity is also taller than the rectangular boxes out there. This means that they are less stable in transit, and pack less well. It is horses for courses. I have no intention of taking my bees near commercial pollination, because I am unable to control their exposure to the chemical mix, and it is high quality pot honey from frames that I seek. If a number of colonies are to be shifted, I see it as a task of strapping them together as a group to achieve the stability. If single, placing in a box gives more stability. I started at my present location with very little shade and very high summer temperatures, so that was the basis for designing boxes. I have a good idea of their limits, when full of bees. It is lower, as with all boxes when the boxes are not fully occupied by the nest. I do not believe the boxes need to be placed in deep shade in summer, though I recommend some shade from around 10am to 3pm. That is just safer, for the unexpected. I give the example often of a position of near the trunk of a small bushy tree, with a spreading canopy and the bees placed just to the north of the trunk. In summer, with the sun tracking high in the sky, the colony will get that 10am to 3pm shade. In winter on the other hand, I recommend, full sun. The sun will be lower in the sky in winter, and the sun will shine below the canopy, and the bees will appreciate that winter sun. It is easy to achieve that situation in one position. This positioning is specific to the type of box, other boxes will be different, and some will be helped by the presence of shrubs at the base of that tree to provide some evaporative cooling. I am an Australian natives enthusiast, and they are not the best for this because many have evolved to conserve moisture. That is why we plant them. If you are fortunate to have a location to suit the rainforest group of plants, they will contribute in summer. Make sure the sun gets to the bees in winter. Plenty of the exotics do contribute well to evaporative cooling in summer. THE REASONS FOR THE FEATURESAn explanation of the designWhile this box may seem more complex than the rest out there, it can be made for a similar cost to those listed commercially available, using efficient construction methods. The benefit of having the timber profile commercially produced as a custom moulding will immediately become obvious. The most complex work is all done. By doing the detailed work in the assembly stage, the beekeeping work becomes simple, just as in honey beekeeping. Another major advantage, of this box and it concepts, opens the way for different propagation techniques. There is the Brazilian propagation method, natural propagation they call it, as well as the supported minimal loss and stress division that the separators facilitate. The system is open to new ideas, as any box should be. If one views developments in Brazil, this becomes all too obvious. Change and development in that country is very rapid. I expect things to change, I welcome ideas for change. That is the only way that progress is made. The bottom boardI have chosen solid timber to provide thermal mass, and at this stage tallowwood for durability. The key objective is to provide a positive drain for any spilled honey to remove it from the box, and to make its presence visible to the beekeeper. Most drains are through the base of the box, and honey discharging from there is easily missed. Mine discharges to the front. Clearly visible. As well there are times when there is excess condensation in all boxes. This is one site that the bees collect and discharge this troublesome moisture. It occurs mostly as a colony is developing, when there is space in the box not occupied by nest structure. Once the bees fill the box with their nest structure, they seem to be able to control the ventilation and associated moisture build-up.
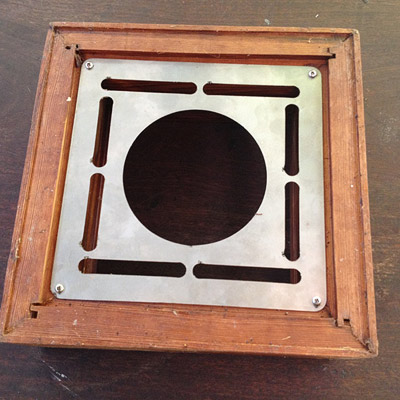
A key point in the assembly of this component is the tendency of wide timber boards to ‘cup’ or to develop a hollow across the board’s width. I position the cleats, substantial tallowwood in themselves, to counteract this and correct minor cupping. I always clamp when screwing to assist this control. The above 3 photos show the bottom board details. Figure 1 is a top view, showing the vee-drain, cut using a table router, connecting to a drilled sump which in turn is connected to an exit to the outside. This is done simply with a hole saw, the centre drill providing the opening, and the hole saw matching the PVC pipe closer, which is standard across all openings in boxes. Stainless steel mesh is heat fixed to the front. This can also be used for eductions. Each super in the box assemblyEvery one of these is identical, made from the same WRC custom moulding profile, with mitred corners, double screwed with stainless steel screws. I am using a lock mitre router bit for a very strong mitre join, and this is very accurate when set up. It is equally possible to use a drop saw, to cut the mitres. Again it must be accurately set up, any slight inaccuracy will result in a twist on the box.
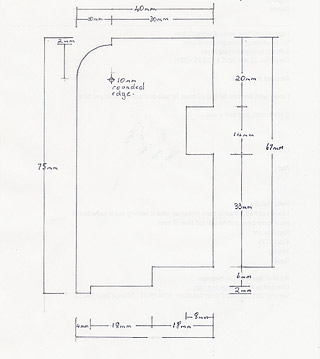
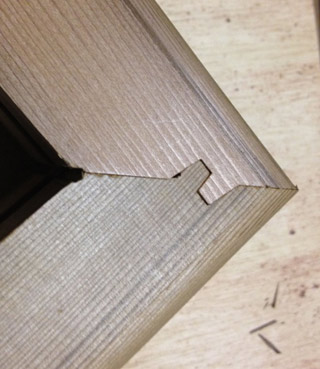
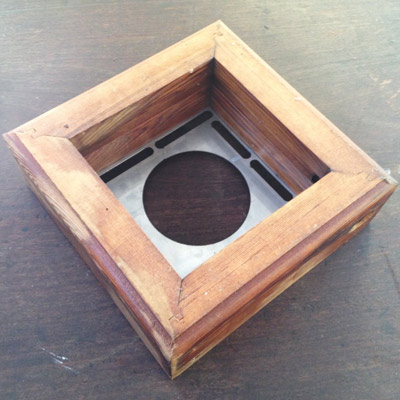
In the illustrations that follow, Figure 4 shows the section design of the custom moulding, and Figure 5, a 0.93cm length that is sufficient for one super. No margin for error if you do your maths. This is ensured by stops. Set up stops on the drop saw if that is used as this keeps fingers away, but the jig used for the lock mitre router bit, determines both ends, and sets the length, and keeps whole hands protected. The super is 23cm square nominally, and this allows it to just fit over many of the square boxes out there, to be compatible with them in divisions, but still using separators. Figure 6 shows the detail of the lock mitre join itself, then Fig 7, the assembled super from the top view, with fixed separator in place. Fig. 8 is the view from below, showing the 5mm rebate which gives the bee space between the fixed top, and loose bottom separator plates.
The contact point between supers is an approximately 12mm strip around the entire inside periphery of that next rebate. This is done very purposely to match the elevated section on the top of each super, the edge set back 1cm. Primarily, this is to shed water, but it is also the seam, actually double seam, that the bees have to resin inside to protect themselves from syrphid fly larvae penetration. A future variation to the loose separator will mean there is just 60cm of seam to seal, a single seam. The standard OATH has 72cm at this seam, but my boxes add another layer of defence as the syrphid flies have difficulty in laying in the area that they prefer, that horizontal seam on the outside. The outer section of the upper box reduces the opening between boxes to less than 3mm, too small for the abdomen of the syrphid fly to fit conveniently. Nothing is absolute, it is a deterrent. Then comes the assembly
The two photos above show the first super added to the bottom board, with base fixed separator, and then the top of super loose separator in place. If you look closely at Fig. 9 it is possible to see the bee space beneath the separator,. The bee space also appeared in a box made by Giorgio Venturieri and Chris Fuller. It is between 4 and 5mm for these bees. This allows all manner of possibilities. Other stingless beekeepers have established with both square and rectangular boxes, that it is possible to place a box that has been in a top position, at the bottom of the new colony. This bee space and separator, facilitates this without bee loss, and allows the bees ready access to the whole area for cleaning and hygiene. The slot arrangement in the separators, lines up with the access ways that the bees always leave around their nest within the box, to link ventilation and access paths, as they see fit. Then when the second separator goes on, this is continued to the next level. What I do differently in colony management, is that I never place more supers on the colony than the bees can manage. When doing the Natural or Brazilian propagation, it is normally just the one box. When the bees develop to fill this, the second box, is added. That is the advantage of a truly modular system, as has been long used with Apis bees. Stingless bees cannot ventilate the unused capacity in over-large boxes. If they are given too much capacity, they will seal off the unneeded space, such as the honey supers often added unnecessarily at the start. What happens is that the moisture will build up in the free space, where there is no bee structure. Some can be discharged, and is often seen at and around entrances. It can be seen as condensation under observation panels, but it is not restricted to any box, pure timber boxes suffer exactly the same problem. The over humid condition is highly undesirable for the bees, they maintain a humidity just over 80% RH in the brood involucrum, but when there is condensation it is 100%, very unhealthy for them. That promotes fungal growth. It is much better to have smaller supers that just stay ahead of their needs, and stay within their capabilities. I have chosen a diameter of 100mm for the brood aperture, just less than the normal involucrum with the absolute intention that both separators lock on to their respective parts of the involucrum to facilitate the division. I NEVER use the term ‘split’, relegating that to history, and a different system. I decided back in the mid 2000s that if ‘splitting’ was the only way to propagate stingless bees, I would be keeping them in logs. The method was just too destructive and hard on the bees. I would keep the bees in logs, was my decision. . Of course, I soon got logs that needed transfer, and by 2007, I had my first boxes with separators. These were of ply, in what I called a MOATH, the standard internal dimensions of the OATH, but with 38mm thick walls of Surian Cedar at the time. I have documented this box, when full of bees, and with a cover similar to that I now use, has taken over 40 oC, full sun and survived. The reason being, the design builds in the temperature lag time, that does protect bees from the heat by delaying the penetration to the nest, until the air outside is cooler, the same mechanism as in a tree.
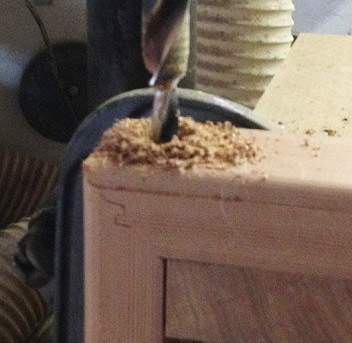
The EntranceThis gets special treatment. It has been shifted to the RH corner and opens into the inside rebates to the walls, to aid the building of defence by the bees. It also causes less disruption to the structure of the involucrum in that position. The bees tend to build a mass of ‘defensive’ resinous, propolis type material in behind the entrance. Some is productive, some less so, just accumulation over time. The plan with the rebates in the walls was to give the bees somewhere to store resin, and that is exactly what they use the rebates for. The entrance opening is drilled using a two stage drill 7/8″ and 1/2″, shown in Fig 11, and placed in such a way that a landing recess is produced, leading to the smaller diameter tube with a slot opening upwards into the underside of the rebate as shown in Fig 12. This is easier to explain than actually do. The task is however, not unduly difficult, and the result is a neat slot entrance in the base of one rebate. It faces upwards. It does discourage water entrance that may be accidentally directed towards the entrance. Wax dipping of componentsThere has been no mention so far of the wax dipping, so it should at least be shown. It is perhaps not for everyone. I have found that it is possible to paint the waxed boxes as part of the process, rolling with acrylic paint as the boxes come out of the hot wax/resin mix. That is a challenge in organising. There is no second chance, no chance for adjusting. Painting onto timber material that is at 100oC is not for the faint-hearted. Gloves, and a rotating jig are essential. My dipping method involves a wax/resin mixture at about 70:30 Apis bees wax: pine rosin. It is heated to about 115oC, and dipping is for 2 minutes for Western Red Cedar, longer for other timbers. TAKE GREAT CARE IF YOU UNDERTAKE THE WAX DIPPING PROCESS. 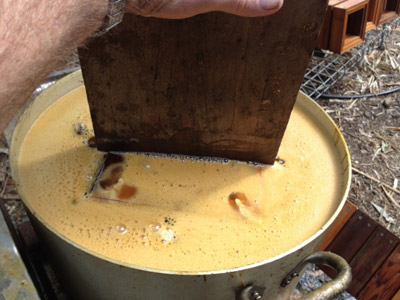 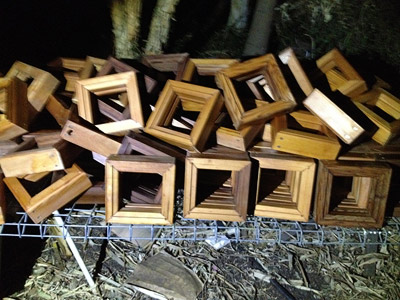 Figure 13 Dipping in hot wax in saucepan, and cooling boxes on frame (care needed)
Bees using the boxes
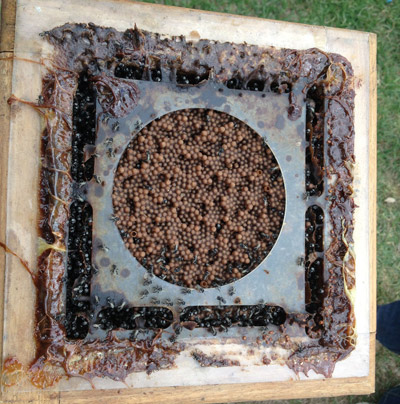
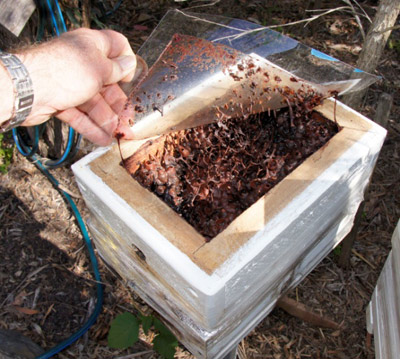
Figure 14 is the photo of a division of a Tetragonula hockingsi colony. It shows just how well they have taken to the separator concept. This has been the case from my very first separators, with both hockingsi and carbonaria. This photo shows the advancing front at the perfect time for a division, just passing through the separator. The emerging brood is in the super above. This is a Mk 1 box, just a different method of box construction, and a PET-G separator. If you look closely, you can see how the bees have incorporated the slots into the involucrum layer structure, yet still allow a passageway outside that. They have made the involucrum partially square. My design objective has been achieved there. This is the loose separator on the top of the lower box, but it is well fixed, the clean contact surface is visible, apart from where I have smeared the pre-cerumen material in lifting. I find it interesting that the bees choose this ledge on which to store what I believe is the precursor of cerumen, that critical building material in the stingless bee colony. There will be more on the mechanism by which they do that to follow. This has long been the case, from the very early versions of the paired separators where the space was available. T hockingsi, lay it out very well indeed, starting with a few drops of this material, then using the warmest place in the nest, the top of the involucrum. Stingless bees are specialist industrial chemists, absolute efficiency in material and energy use.
From this first super stage, most carbonaria colonies will progress to 3, hockingsi perhaps 4. In the Fig 16 super photo, the bee space between the two supers is visible. The bees simply build their normal vertical pillars to facilitate passage across this space. The objective of the stainless steel is that it is stiff, and the bees accept readily. It is fixed in place to the lower super by the bee propolis. There is little if any honey and pollen pot damage in a division. It is the damage to honey pots in particular that are attractive to the parasites of stingless bees. Phorid flies will lay in broken honey pots and spilled honey. Avoid these, and the bees have a fighting chance of control. As well the scent of the breaks wafts widely on the air, attracting syrphid flies and the relative newcomer, the small hive beetle (SHB). Now there is the question of where does one divide a box with 3 supers? The tendency of the brood, and the involucrum, in every box is to develop upwards, and I encourage it to grow to the inspection panel at the top of the assembly, shown in Fig 14. This is great for observation, and it shows just where the brood is, and the stage. If this is the case, this simply means that the top super can be taken off, with the brood and stores it contains as the division. It becomes the first super of the new colony as the bottom super. A new box can be placed on top, if they are ready for it, or it can be delayed to allow them to sort themselves out after the division. This is part of the concept of not giving too much space, too early, before they need it. Just the same as in Apis. Then the next stage is to add the inspection panel, and this serves a number of purposes. There is a gauze insert for ventilation under the control of the bees, they do close gauze very quickly, and there is a hole in which feeders or parasite traps can be placed. These are most relevant in transfers from logs, or watermeter boxes, where damaged nest material just may be attractive to the various parasites. At this early time, the defence of the bees is not organised, and the internal traps will take catch phorid fly especially, plus some SHB out of the box. I only add the traps if I see phorid flies. There will be an article on the techniques on my website in due course. The traps can be used externally beside the entrance, but I have a new design from Brazil, actually incorporated in the entrance. That will feature in the control article. As a general rule, never transfer damaged honey pots, and preferably no damaged pollen pots. If there is no brood visible at the inspection panel, the colony can be divided between the first and second supers counting from the bottom. And in any case and if in doubt, no damage is done, by just levering the boxes up on one edge to look. That 3mm gap that is there all around the outside edge, makes this easy. A wide hive tool is less likely to damage timber.
Now for the image of the box with observation panel in place.. This is Fig 17, and at the top is a PET-G flexible inspection panel. At the top left corner is a mesh panel for ventilation, at the discretion of the bees, at the bottom right of the panel is an opening to take a feeder or trap made from a 35mm film canister. These are getting rarer unfortunately but other containers can be substituted. This arrangement allows access from the outside, for recharge, refilling, or removal. The canister cap can serve as a plug. It is a very convenient arrangement. The bait mix is made up of roughly equal parts of stingless bee honey, water, syrup. Add enough vinegar so one can just smell it. The purpose is to make the mix more attractive to the pests, but not to the bees. This can be improved by crumbling a small amount of pollen into it. The trap design is that which Col Webb has posted in the past, using the tip of a caulking gun tube as a one-way entrance. Never waste them for caulking purposes. Details are in the article on pests. This Aussie INPA box is set up with an entrance closure on the second super, the hockingsi arrangement. T hockingsi will most often use two entrances at the front, often to come and go, with bees trafficking up and down the outside front of the box. The observation panel serves its major function to monitor progress, health and status of the colony. When the super is full, and especially if brood is just below, it will remain visible for a lengthy period of time, if light is prevent from getting to the top surface. Blocking light is a must. It takes a combination of a full and active box, and no light to keep that functional. While a colony is developing, it may be that it will need replacing. Do not rush this because only if the colony is developed enough will it stay observable. The thinner flexible sheet that I use has the advantage that a single corner can be lifted to check what is happening, and this does not disturb all the attached structure. I stopped rebating the sheet in place, because with the early lids, any moisture getting to that top surface was guaranteed to get into the rebate. Not an issue with the arrangement now, but could be with other boxes, and is a factor to consider. This flexible inspection panel is almost universal in Brazil. The other benefit of course, is that it is one less construction step to include in the work programme. It is important, to minimise the edge overlap. The inspection panel should be just 1cm larger in all directions than the internal size of the box. The Aussie INPA has ID of 15 x 15cm, so the observation panel is 17 x 17cm. This is a hardwood version of the Zabel box, 20×28 cm with 38mm walls Collecting propolis /resinAs an aside to this discussion, if you have a need or wish to produce propolis, or collect resin, the simplest and cleanest way is to allow light to get to this inspection panel. The bees will coat it on the inside, with perhaps 6mm of the material you seek. It only takes the cover to be lifted to break the light seal and the bees do the rest. This is my approach as I seek to collect resins from desirable sources to add to the wax/resin mix used for dipping boxes. At this stage, I have just collected cadaghi resin from inside boxes, and refined by melting in beeswax, then filtering hot. That is not the resin I want. I look for resins that may confer added durability, and that are attractive to the bees themselves. Cadaghi at least fits the latter. To get the propolis off the inspection panel, put it in the freezer to chill down. It should then flake off. This is a mixed source product, reflecting a average of what is collected overtime by the colony. My interest is primarily the resin, which the bees will also store, by plant species at this location, the challenge is to get enough. The coverThis is where my box differs most from all the other boxes out there, but is arguably the most important single component. In lighter moments, I describe it as being designed by ants. I have no fear of ants on and around my stingless bee boxes, they have always been there and serve a purpose. In the design phase, when I first started, our block had little shade, so I had to provide it in the cover. I saw ants removing their eggs and larvae from the favoured space between the inspection panel, and the cover, in the heat of the day. They would carry them down into the garden mulch, and I figured it was simply too hot for them there under the cover. Too hot for the ants, relatives of the bees, it is too hot for the bees. I modified the covers to arrive at the covers I have now. The ants stay, and even the queen has moved up in some cases. Some boxes even have the queens of two species of ants up there. The covers are a work in progress, and will remain so, as I seek to get more and more ability to withstand heat. The main boxes available are vulnerable to losses in the conditions that we will experience in future summers. WE MUST DO BETTER TO PROTECT OUR BEES, EVEN THOUGH SOME CHOSE TO IGNORE THE ISSUE.
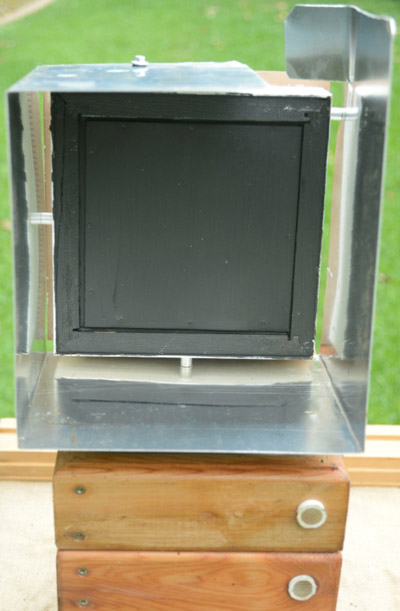
This is my preferred concept at the moment, subject to testing. It is in fact built around a fourth box, with the underside painted black and looking to achieve the same effects as in a darkroom, that light will not reflect around a corner painted matt black. I still have the tile for weather proofing on the top, and the cavity has Hebel or hardwood, and polyurethane insulation. The objective is for the heat to penetrate slowly, and not be passed through until late in the afternoon, as happens in a tree. That is where I started with my data-logging work. To get the effect in a box, has proven elusive. It takes a combination of thermal mass and insulation. This cover uses a different method to mount the aluminium shroud, it keeps it further away from the supers, and allows air flow more easily. The intent is to shade, and to deflect the extremes of the hot breezes in the worst of summer. Those breezes proved damaging on some sites in January 2014, penetrating well shaded sites.
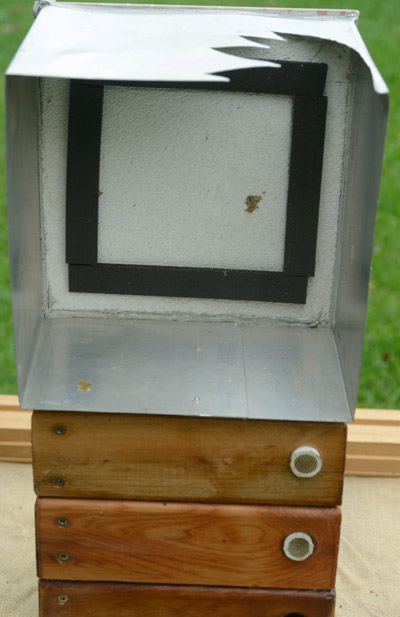
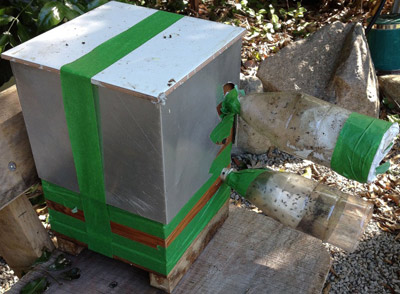
Version 2 of the cover is shown in the photos below. It still has the aluminium shroud, but it fits closer to the box, and is attached to the tile cover. A neoprene rubber strip is used to seal light from the observation panel. It is stuck to the neoprene block, which is the structural base of the structure. Fig 22, showed a use in a rescue relocation. I vacuum remaining bees on site,using a customised cordless “bee vac”. Many bees refuse to leave the smells of their old nest. This was in a tree blown down in a storm. There is no way they were going, even to the involucrum. The vacuum containers fit the entrances via a piece of PVC tubing, my only use of that product. They transfer straight to join the rest of the retrieved bees with no further losses. A significant part of the nest had been lost, probably the queen, and every bee saved would help survival, even though I did have the whole involucrum. The involucrum was quite small considering the age of the colony. The bees had chosen the drain opening, part covered by tape, as their new entrance. They keep springing surprises. Even natural colonies can become space bound, limited in nature to the building space available. That is something of which we need to be aware in our boxes and management. I have mentioned versions 2 and 3 of the cover, not version 1. This was obviously the first, and was in fact based on 40mm tallowwood, a white tile, and a similar aluminium shroud to that in version 2. The 25mm gap between the timber and tile was filled with polyurethane spray in foam insulation. This also served to glue the parts together, and as I mentioned earlier, this cover works very well. The challenge is, the timber is not stable enough for that position without the neoprene, so I needed to change. The cover concept however, was excellent in performance Colonies in rectangular boxes with 38mm wall thickness and this cover, withstood full sun at 40 o C back on that day in January 4, 2014 when so many colonies died in Samford Valley. Heat tolerance can be built into a box. The cover is critical. The mountingI have always done this differently to most, The cleats on the bottom board are designed to straddle a timber plate mounted on 3 rods, that simply slides down the top of a star picket. It is simple to make and quite secure because of the weight of the assembly. A strap arrangement can of course be used if desired depending on situation or where knocks are expected. The logic is that a bracket placed on top of a star picket that is well driven in, is more likely to stay vertical. The height of the star picket needs to be minimised for management reasons, to get the maximum benefit from the observation panel. The lid can always be lifted in passing if convenient to do so. While I make no attempt to exclude ants, it can be done with only the star picket on which to provide barriers. Ants require considerable effort to stop.
been foremost to me. This is but one box of many being used for these bees. To me, the most promising development of recent times, is that numerous stingless beekeepers are going their own path, and putting their own ideas together in a less than encouraging environment. This is to be applauded, there should never be a situation where one box is the only box. The greatest change for the better that I see happening, is a move to a separate bottom board and cover, and placing the upper box at division time onto the specially designed bottom board. This is very different from the concepts of the past. With the right designs, this eliminates all risk of slumping, a problem that has been with stingless beekeepers for 30 years. Such a simple change! Incorporating separators and other comprehensive internal support does likewise and achieves many other benefits. The use of paired separators is very important with our bees. A single separator of any type may support the structure above, but the bees will attach honey and pollen pots to it from below. At best, anti-slump bars are token support, they are not placed correctly, they are too narrow. They do nothing to support the brood, because they are placed too wide and do not engage. They are of little help with T hockingsi. When the division is done, honey and pollen pots will be broken open. That will provide the smell that attracts phorid flies especially, but also SHB, and syrphid flies. In the course of regular management, it is simply better not to add to the risks at the time of division. The ability to work with colonies without this problem, for inspection for the presence of the new diseases recently reported for example, is a step forward. As well, access to the brood structure in a convenient way, means that brood can be taken for different methods of propagation, the Brazilian Natural Propagation method or others not thought of yet. Brood can even be taken to assist a struggling colony. It can be taken and mailed to other locations even. Colonies in boxes with sealed lids just do not offer these chances conveniently. By far the best management is to eliminate all breakage of honey and pollen pots at these sensitive times, and just make that sort of careful practice, the norm. Our thought process should be to try to eliminate all sources of losses of bees in these management tasks as well. Sure, the bees can be replaced, but each and every bee lost has a cost to replace. It is the same as for each field bee lost, the colony has had to use valuable resources to get that bee to the field. We should not be the cause of adding to that cost to the colony when they are working for our good, our benefit. I look to produce high quality pot honey which will eventually be labelled with the species of bee that has produced it. T carbonaria and T hockingsi produce very different pot honey, and they need to be appreciated for their differences. We are just at the very beginning of the learning phase with these bees, introducing them to a part framed box, puts them where Apis was in the mid 1800s. Just perhaps , we can progress further. |
Bob the Beeman
Information on Australian Native Stingless Bees


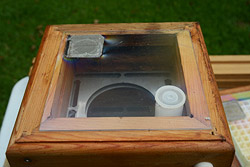
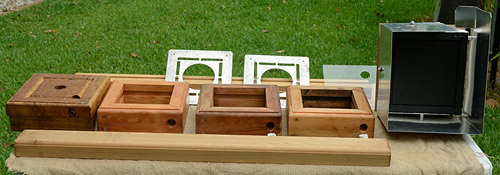
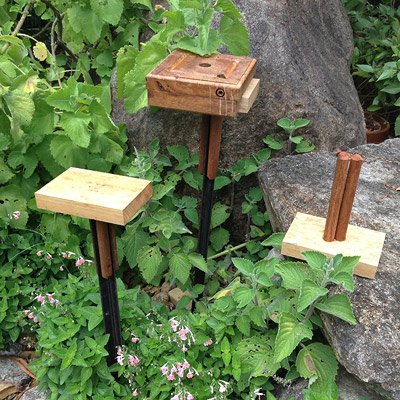
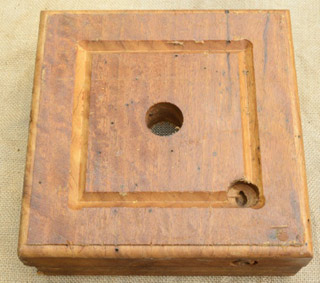 Figure 1 Bottom board details
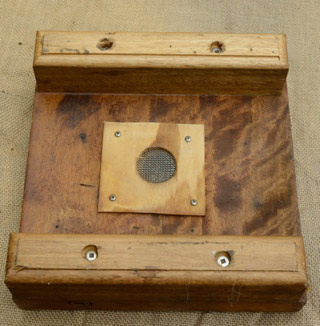 Figure 2 Under view, vent
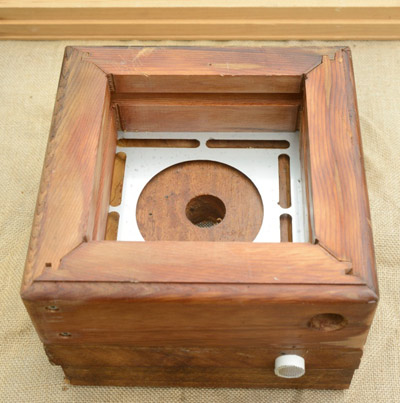
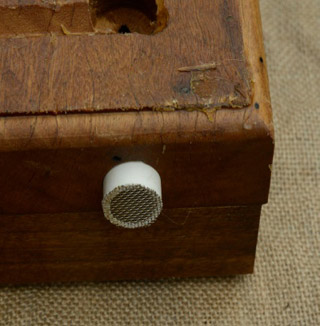 Figure 3 Drain hole
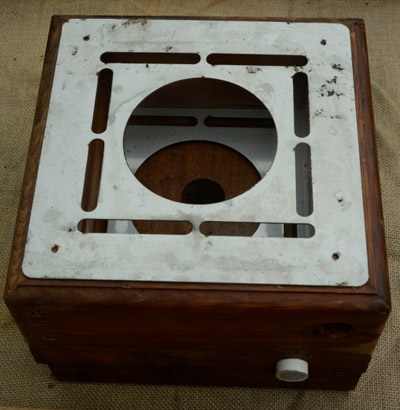